Running an Unit Test from the IDE
The isCOBOL Unit Test is integrated in the isCOBOL IDE.
It is good practice to compile programs with -g option in order to have accurate exception stacks when a test fails, so this option should be activated either in the Preferences or in the project’s settings. Setting the option in Preferences will affect the next projects that are created in the workspace. Setting the option in project’s settings will affect that particular project.
In order to activate the -g option in the Preferences:
1. Click on Window in the menu bar,
2. Choose Preferences,
3. Expand isCOBOL in the tree and select New Project’s Settings,
4. Change the the Compile/Runtime Options page,
5. Change to the G page and activate -g,
6. Click on Apply and Close.
In order to activate the -g option in the project’s setting:
1. Right click on the project name in the isCOBOL Explorer view,
2. Choose Properties from the pop-up menu,
3. Expand isCOBOL Settings in the tree and select Compile/Runtime options,
4. Change to the G page and activate -g,
5. Click on Apply and Close.
In order to create a Unit Test in the IDE, a dedicated Run Configuration must be created.
1. click on Run in the menu bar and choose Run Configurations...,
2. Right click on isCOBOL Unit Test in the list on the left and choose New Configuration,
3. Fill the fields as follows:
Field | Value |
|---|---|
Name | The name that you wish to assign to this Run Configuration. |
Project | The project where the programs to test are included. Choose it from the list. |
Program list | Click on the Browse button after the field and use the pop-up dialog to select the programs to include. You can select the class files either from the current workspace or from the file system. Be careful to add only main programs, so programs that don’t use Linkage Section items. |
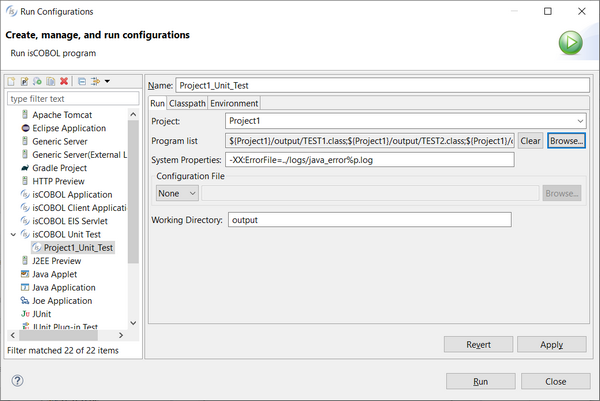
4. Click on the Apply button, then on the Run button
The Unit Test will run and the results will be shown in the isUnit view.
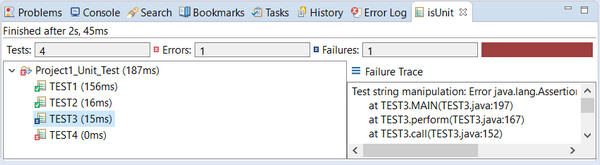
A green panel in the top right corner of this view means that all tests were successful. A red panel instead means that at least one of the tests failed. Clicking on the program name populates the Failure Trace field with the exception stack of the error that caused the failure of the test.
From this moment you can run or debug the test by choosing the Run Configuration name from the Run History menu and the Debug History menu. It’s also possible to run the Unit Test along with a Coverage test, as explained later in this document.