Changing the language in WebClient’s user interface
WebClient includes a series of messages and dialogs that are shown to the user. These messages and dialogs are in English by default, however it’s possible to have them translated in multiple languages. The WebClient SDK includes two alternative language packs that are ready to use. You can customize these language packs as well as add brand new ones.
Customizing the language packs
Language packs are installed in the webclient/lang directory of the WebClient SDK.
The webclient/lang directory includes a sub folder for every language and a select.json file where available language are listed. Inside each language folder you find a file named msg.json that includes the translation of each WebClient message label. By default, the following alternative languages are available:
• German
• Spanish
To customize a language translation, just edit the corresponding msg.json file.
To create a new language:
1. Copy an existing one, e.g. copy webclient/lang/de to webclient/lang/mylang
2. Edit the file webclient/lang/mylang/msg.json replacing JSON field values with your custom translations
3. Edit webclient/lang/select.json adding your custom language to the list
Note - a basic knowledge of the JSON format is required to customize WebClient’s languages.
Enabling language selection in WebClient’s home page
By default, the WebClient’s home page displayed when you browse to the base URL http://server:port uses the English language.
To enable the language selection:
1. use the WebClient Admin to edit the Server Config and set Localization Folder to "${webclient.rootDir}/lang",
2. click the Apply button when prompted.
After this change, the WebClient’s home page will show a combo box that allows you to change the language.
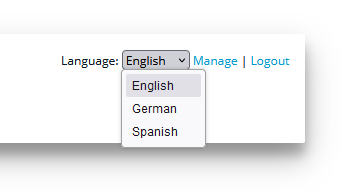
By changing the value of this combo-box, the WebClient’s user interface is translated to the selected language.
Making an application start with a specific language
In most cases the users will go directly to the web application instead of landing on the WebClient’s home page (e.g. they browse to http://server:port/appname, not to http://server:port).
In order to make users see a specific language in the WebClient’s user interface when they browse directly to the application, proceed as follows:
1. Create a folder that will host your custom HTML files
2. Extract the index.html file stored in webclient/webclient-server-war and copy it to the folder that you’ve just created. You can use an archive manager software like 7-Zip to perform this operation easily.
3. Edit the index.html file. At the very beginning of the first script tag, set the global variable webclientLang to the desired language id using the localStorage.setItem() function. For example, in order to use Spanish language:
... <script> localStorage.setItem('webclientLang', 'es'); var webswingInstance0 = { options: { ... |
Note - the language id must match with the name of one of the folders installed under the lang directory of WebClient.
4. In the app configuration, set Web Folder to the path of folder you created at step 1.