Modernization Guides
UI Modernization (from character based to graphical and web)
This guide explains the modernization process of a legacy COBOL application with character based user interface. It discusses the necessary steps to transform the character based user interface into a graphical user interface and eventually to a web user interface.
The code snippets used by this guide are taken from the modernization example installed with isCOBOL in the folder sample/modernization.
For an easy conversion of the user interface it’s good practice to have the user interface management separated from the backend processing. The installed example is an application of this kind.
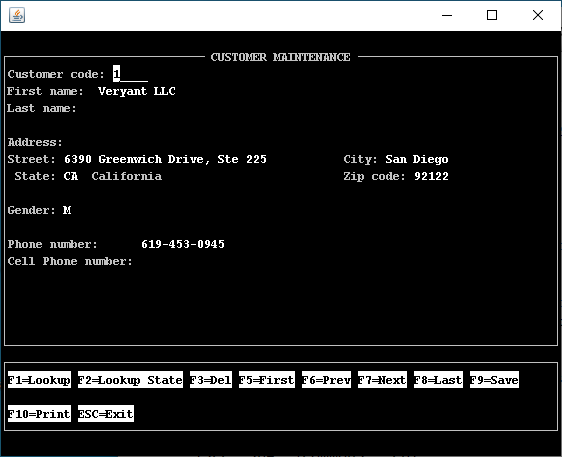
The starting point is a character based screen whose Screen Section definition is as follows:
01 s1. 03 "Customer code:" line 3 col 2. 03 using cust-code col + 2 high prompt. 03 "First name: " line 4 col 2. 03 using Cust-First-Name col + 2 high prompt. 03 "Last name:" line 5 col 2. 03 using Cust-Last-Name col + 2 high prompt. 03 "Address:" line 7 col 2. 03 "Street:" line 8 col 2. 03 using Cust-Street col + 2 high prompt. 03 "City:" col 50. 03 using Cust-City col + 2 high prompt. 03 " State:" line 9 col 2. 03 using Cust-State col + 2 high prompt after CHECK-STATE. 03 from State-Description col + 2. 03 "Zip code:" col 50. 03 using Cust-Zip col + 2 high prompt. 03 "Gender:" line 11 col 2. 03 using Cust-Gender col + 2 high prompt. 03 "Phone number: " line 13 col 2. 03 using Cust-Phone col + 2 high prompt. 03 "Cell Phone number:" line 14 col 2. 03 using Cust-CellPhone col + 2 high prompt. 01 s-func. 03 "F1=Lookup" line 21 col 2 reverse. 03 "F2=Lookup State" col + 2 reverse. 03 "F3=Del" col + 2 reverse. 03 "F5=First" col + 2 reverse. 03 "F6=Prev" col + 2 reverse. 03 "F7=Next" col + 2 reverse. 03 "F8=Last" col + 2 reverse. 03 "F9=Save" col + 2 reverse. 03 "F10=Print" Line 23 col 2 reverse. 03 "ESC=Exit" col + 2 reverse. |
At runtime, the screen appears as follows:
The minimal modification that can be done to the Screen Section in order to obtain a graphical screen is to change text labels and FROM fields to LABEL controls and USING fields to ENTRY-FIELD controls as follows:
01 s1. 03 label "Customer code:" line 3 col 2. 03 entry-field using cust-code col + 2 high prompt. 03 label "First name: " line 4 col 2. 03 entry-field using Cust-First-Name col + 2 high prompt. 03 label "Last name:" line 5 col 2. 03 entry-field using Cust-last-Name col + 2 high prompt. 03 label "Address:" line 7 col 2. 03 label "Street:" line 8 col 2. 03 entry-field using Cust-Street col + 2 high prompt. 03 label "City:" col 50. 03 entry-field using Cust-City col + 2 high prompt. 03 label " State:" line 9 col 2. 03 entry-field using Cust-State col + 2 after CHECK-STATE. 03 label State-Description col + 2. 03 label "Zip code:" col 50. 03 entry-field using Cust-Zip col + 2 high prompt. 03 label "Gender:" line 11 col 2. 03 entry-field using Cust-Gender col + 2 high prompt. 03 label "Phone number:" line 13 col 2. 03 entry-field using Cust-Phone col + 2 high prompt. 03 label "Cell Phone number:" line 14 col 2. 03 entry-field using Cust-CellPhone col + 2 high prompt. 01 s-func. 03 label "F1=Lookup" line 16 col 2 reverse. 03 label "F2=Lookup State" col + 2 reverse. 03 label "F3=Delete" col + 2 reverse. 03 label "F5=First" col + 2 reverse. 03 label "F6=Prev" col + 2 reverse. 03 label "F7=Next" col + 2 reverse. 03 label "F8=Last" col + 2 reverse. 03 label "F9=Save" col + 2 reverse. 03 label "F10=Print" line 17 col 2 reverse. 03 label "ESC=Exit" col + 2 reverse. |
After this modification, the screen appears as follows: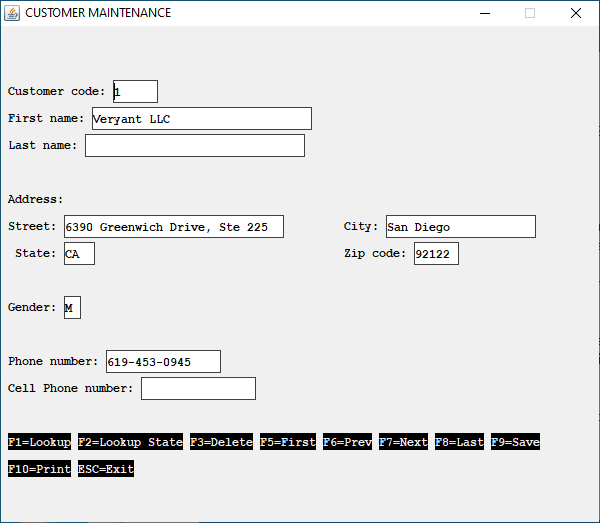
A little more complex modification is to add some properties and styles to LABEL and ENTRY-FIELD controls and replace text labels that describe an action with graphical PUSH-BUTTON controls as follows:
01 s1. 03 label title "Customer code:" line 3 col 2 . 03 entry-field value cust-code numeric col + 2 id 78-id-cust-code . 03 label title "First name: " line 4 col 2 . 03 entry-field value Cust-First-Name col + 2 id 78-id-first-name . 03 label title "Last name:" line 5 col 2 . 03 entry-field value Cust-last-Name col + 2 . 03 label title "Address:" line 7 col 2 . 03 label title "Street:" line 8 col 2 . 03 entry-field value Cust-Street col + 2 . 03 label title "City:" col 50 . 03 entry-field value Cust-City col + 2 . 03 label title " State:" line 9 col 2 . |
03 entry-field value Cust-State col + 2 after CHECK-STATE id 78-id-cust-state . 03 label title State-Description col + 2 . 03 label title "Zip code:" col 50 . 03 entry-field value Cust-Zip col + 2 . 03 label title "Gender:" line 11 col 2 . 03 entry-field value Cust-Gender col + 2 . 03 label title "Phone number:" line 13 col 2 . 03 entry-field value Cust-Phone col + 2 . 03 label title "Cell Phone number:" line 14 col 2 . 03 entry-field value Cust-CellPhone col + 2 . 01 s-func. 03 push-button exception-value 1 self-act title "F1=Lookup" line 17 col 2 size 14 . 03 push-button exception-value 2 |
self-act title "F2=Lookup State" col + 2 size 14 . 03 push-button exception-value 3 self-act title "F3=Delete" col + 2 size 14 . 03 push-button exception-value 5 self-act title "F5=First" col + 2 size 14 . 03 push-button exception-value 6 self-act title "F6=Prev" col + 2 size 14 . 03 push-button exception-value 7 self-act title "F7=Next" line 18 col 2 size 14 . 03 push-button exception-value 8 self-act title "F8=Last" col + 2 size 14 . 03 push-button exception-value 9 self-act title "F9=Save" col + 2 size 14 . 03 push-button exception-value 10 self-act title "F10=Print" col + 2 size 14 . 03 push-button exception-value 27 self-act title "ESC=Exit" col + 2 size 14 . |
After this modification, the screen appears as follows:
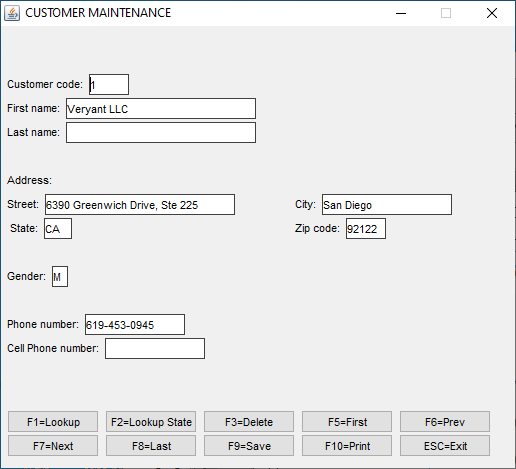
Note - if you wish to assign a special attribute to all the fields, for example if you want all the push-buttons to have the SELF-ACT style, you can use the compiler configuration property iscobol.compiler.gui.<control-type>.defaults instead of writing "SELF-ACT" in every push-button description in the Screen Section.
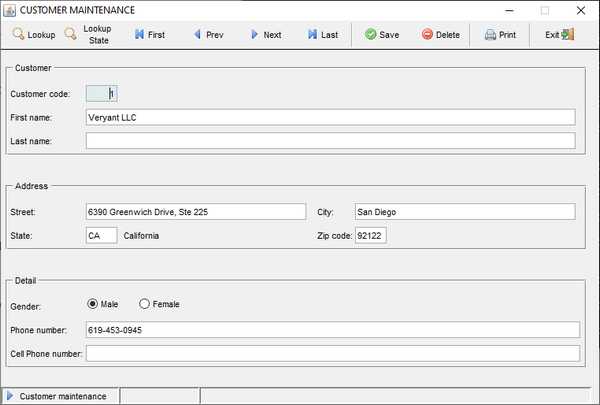
Though the screen is graphical it’s still not perfect; it doesn’t look like a modern and appealing screen. A further effort is required in order to obtain a good screen. The following changes are suggested:
• Reorder the graphical control and put frames around them to better describe the information that they host,
• Add icons to the buttons and move them to a tool-bar on top of the screen
• Use different controls where applicable. For example the Gender can be accepted using two radio-buttons instead of an entry-field. This will save you for checking if the user input a valid value.
• Add a status-bar
Refer to CUSTOMER.cbl in sample/modernization/graphical/3-full-gui for the necessary code.
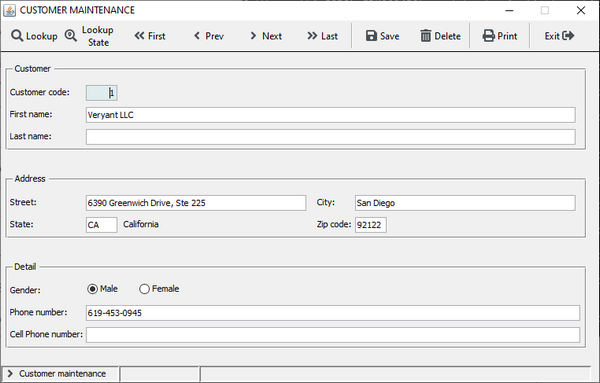
After these changes, the screen will look like this:
Button icons could be replaced with glyphs retrieved from a symbol font, like Font Awesome.
Refer to CUSTOMER.cbl in sample/modernization/graphical/4-advanced-gui for the necessary code.
After this change, the screen will look like this:
An additional cosmetic improvement can be introduced at compile time by setting iscobol.compiler.gui.<control-type>.defaults to apply properties and styles to all the controls without code changes. Let’s consider, for example, the following Compiler configuration:
# Compiler.regexp to remove the 3D and "ERASE" styles when displaying the window iscobol.compiler.regexp="(?i)( 3-D,)" "" \ "(?i)( 3-D)" "" \ "(?i)( ERASE,)" "" \ "(?i)( ERASE)" "" #### code injection for controls #### # add the gradient color on all windows iscobol.compiler.gui.window.defaults= \ gradient-color-1 rgb x#FFFFFF \ gradient-color-2 rgb x#F2F5F9 \ gradient-orientation gradient-northeast-to-southwest # add the transparent style to all labels, check-boxes and radio-buttons iscobol.compiler.gui.label.defaults= transparent iscobol.compiler.gui.check_box.defaults= transparent iscobol.compiler.gui.radio_button.defaults= transparent iscobol.compiler.gui.frame.defaults= transparent # set the white color for all toolbars iscobol.compiler.gui.tool_bar.defaults= background-Color rgb x#FFFFFF \ foreground-Color rgb x#000000 # add the flat style to all push buttons iscobol.compiler.gui.push_button.defaults=flat # add the underline style to all entry-fields iscobol.compiler.gui.entry_field.defaults = border-width (0, 0, 2, 0) \ border-color rgb x#DAE1E5 \ margin-width (3, 3, 3, 3) # add the rollover effect on the grid control iscobol.compiler.gui.grid.defaults= \ cursor-frame-width 1 \ cursor-frame-color rgb x#264188 \ row-rollover-background-color rgb x#8BA2DE \ row-rollover-foreground-color rgb x#264188 \ heading-rollover-background-color rgb x#8BA2DE \ heading-rollover-foreground-color rgb x#264188 # add the grip style to the status-bar iscobol.compiler.gui.status_bar.defaults= grip |
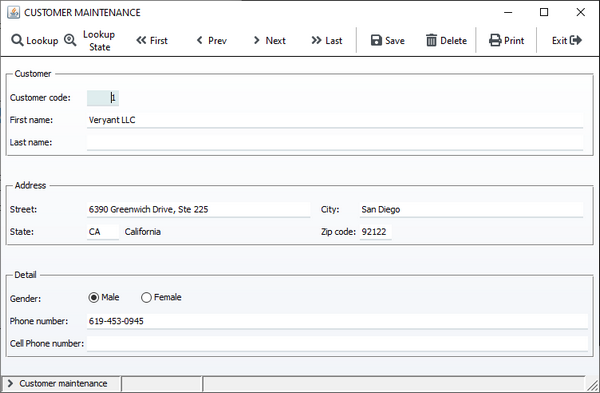
After recompiling the program with the above settings, the screen will look like this:
The last step in the modernization process is to bring our user interface to the web.
It can be done in three ways, discussed below:
WebClient
WebClient allows you to display your screen in a web browser. The screen that the user sees in the browser is identical to the screen he would see by running the desktop application.
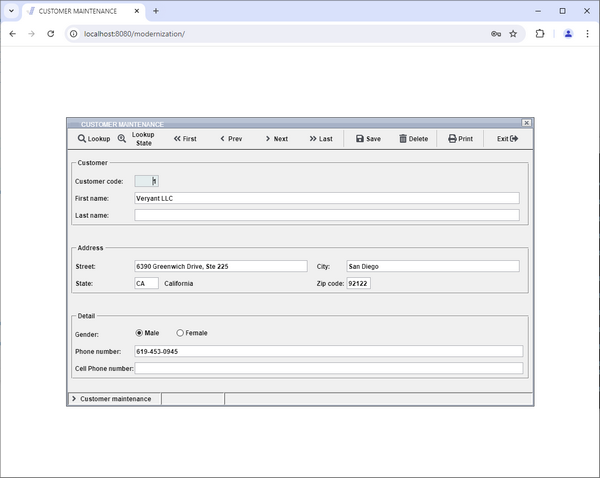
With this solution no change is required to the user interface management code.
However, by default the program doesn’t look like a web application, it looks more like a remote desktop implemented in the browser.
In order to make the program more similar to a web application, you should undecorate and maximize the window as follows:
Before | After |
|---|---|
display independent graphical window background-low system menu title "CUSTOMER MAINTENANCE" size 125 lines 30 control font window-font handle h-main event WIN-EVT | display independent graphical window background-low system menu title "CUSTOMER MAINTENANCE" size 125 lines 30 control font window-font handle h-main event WIN-EVT resizable undecorated action action-maximize |
After this small change, the screen will look like this:
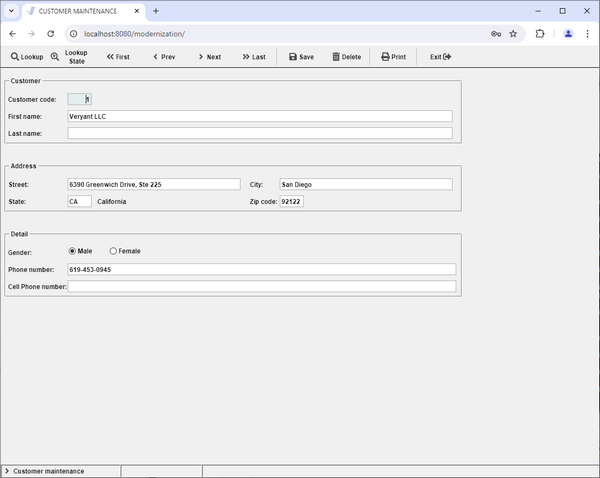
It looks more similar to a web page.
However, to improve the web-like layout even more, you might consider building an HTML container around your application. This is demonstrated by the example provided in the folder sample/modernization/webclient/encapsulated. The final result is: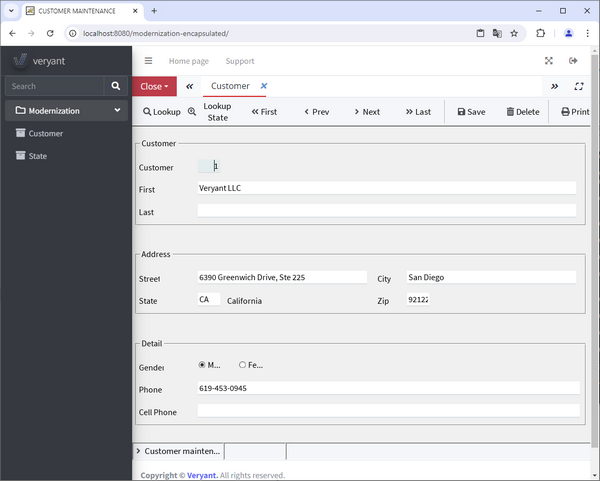
For more information about WebClient, see isCOBOL Evolve: WebClient.
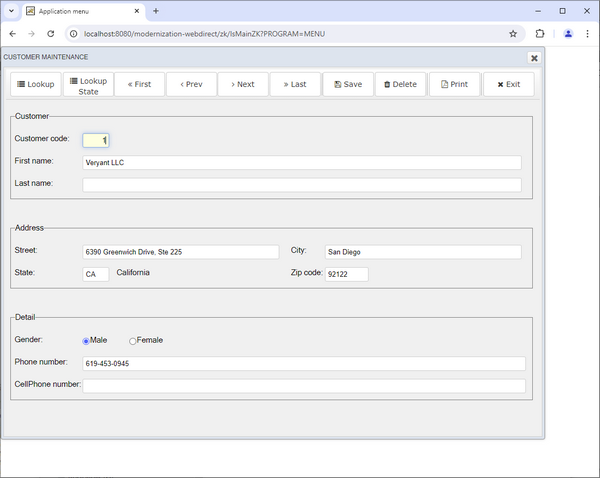
WebDirect
The WebDirect option allows you to display your screen in a web browser. The screen is rendered using the ZK Framework so the layout is a little different than the one you would see by running the desktop application.
Unlike WebClient, WebDirect doesn’t provide a full compatibility with the Swing components used by the desktop application. In particular:
• some control properties and styles are not supported,
• java-beans based on Swing and JavaFX components must be replaced with the proper ZK component.
For more information about the Web Direct 2.0 option, see WebDirect option.
A complete and working example is provided in the folder sample/modernization/eis/wd2.
Servlet option
This kind of option allows you to obtain a real web application. The user interface management must be rewritten in HTML5, CSS and JavaScript. The COBOL code is maintained only for the backend processing.
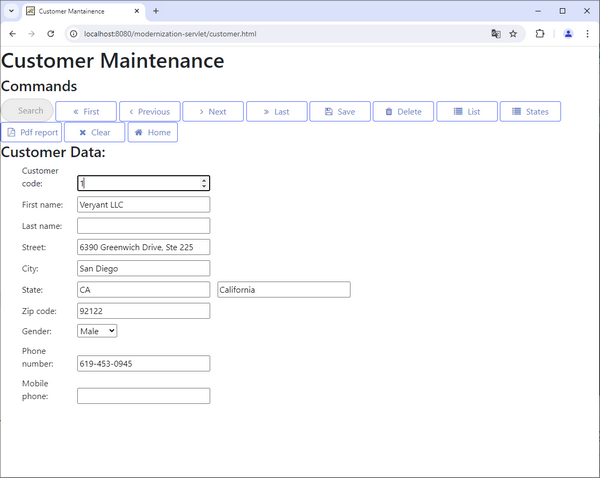
For more information about servlets written in COBOL, see COBOL Servlet option (OOP).
A complete and working example is provided in the folder sample/modernization/eis/servlet.